First of 64-bit Windows 8.1 tablets arrives, this one from HP

Sick of Android? Check out the Sailfish OS-powered Jolla phone

How The Syrian Electronic Army Hacked Forbes: A Detailed Timeline

Showing posts with label JACK. Show all posts

Monday, February 24, 2014

Check out the part one before getting started. [ Part 1 ]

Minimum System Requirements:
•Intel® Pentium® 4 or Pentium® D 3.2GHz
•2GB of RAM
•400Mb of available hard-disk space for installation
•Microsoft® Windows® XP* with SP3/SP2 or Windows 7 with Service Pack 1/ Ultimate/Professional/Home Edition
•1024x768 display with 16-bit color and 128MB of Graphic Card or External 128Mb Graphic Card

1.Open MeGUI and make sure these things and settings have listed.


[TAB] Video Encoding Config


[TAB] Audio Encoding Config


2. After that, click on "Tools > AVS Script Creator" (or just press Ctrl+R).


3.Select video file in Video Input.


4.When you press open it, new windows will pop up, select One Click Encoder.


5.Click on Config in Target option after *scratchpad*


*Do not press OK until all the tab is done.

6.Then, Select Output Resolution to 640 (or same resolution which already movie have) and check AutoCrop.


7.After That, move to next tab Audio!


8.After That, move to next tab Output!

I used 640 resolution which movie already have, and file size 700Mb and I select it to 375Mb

Now, Select your the Filesize for your Movie/Video. I used 375MB size [700Mb original size] Check MKV!

9.Now click on UPDATE to Update your profile! Press Ok
10.Then Press GO!!


Now, It will open MeGUI main screen. Click on Queue

Here you will find that your movie in in queue and ready to get encoded!

11.Just click on START!!


It will work like this.


It will take  about 15-30 minutes for encoding process to complete based on your specifications of computer.
Softwares that you'll need:
1) K-Lite Codec
2) Microsoft's .NET Framework
3) ffdshow (32bit or 64bit)
4) x264 (32bit or 64bit)
5) Preferred Filter Tweaker for Windows 7 (32bit or 64bit)
6) Avisynth_258
7) mkvtoolnix-unicode-6.1.0-setup
8) megui-0.3.1.1040.setup

Softwares Download


Procedure:
1.After installation, run MeGUI. It will find by default - "C:\Program Files\MeGUI".


2. Now, Update it!


3.Check all files and click on UPDATE. Wait until it gets updated.


4.After you reach updating this file "Updating Tx264. File 37/40.", you'll get a pop-up of "Preset Importer". Just select them all and click "Import" thats it.


5.After you click "Import", you will get this "Duplicate Profile" notice just click "Overwrite Profile".


6.After you reach "Updating STAudio. File 38/40.", you'll get another pop-up of "Preset Importer", just do as I said above "Check all" and import.

7.Then, Click "Import" you'll get another same box of "Duplicate Profile", just tick the box of "Don't Ask Me this Again" and click "Overwrite Profile".


8.Check all & import!
9.After the update is done, you'll get the box of "Restart" just click the "Yes" button and wait till the MeGUI restarts!


10.This time you will get a message but don't worry, everything is okay! Just click YES!!


11.Make sure all of them "Selected". If yes, then click the "Update" button.


12.If you got this error, then click yes and download the "NeroAACenc.exe" file


13.One by One, Select all and Import! After update finishes restart again by clicking "Yes".


Now, we have to Bypass this Error. To do this, Download Nero AAC
14.Extract files and you will see some folders as shown below!

15.
a)If you're with Linux then go to linux and copy the files. Paste it in C:\Program Files\MeGUI.

OR

b)If you're Windows user then go to "Win32" folder
You will see three files, Copy 3 of them!
C:\Program Files\MeGUI Paste it if you got (merge the files) just say yes merge it! thats it now open MeGUI it's working no need to update or anything!

16.Now Close MeGUI! Go to folder where you downloaded the File "Profiles From above"
You'll get a folder called "allprofiles" just copy the folder and paste it in "C:\Program Files\MeGUI
replace the "allprofiles" folder with new one.

Let's proceed to part two. [ Part 2]

Monday, January 27, 2014

Microsoft Office 2010 Professional and Professional Plus installs a handy option (Shared Folder Synchronization) to Desktop and Folder’s Context Menu for its Microsoft SharePoint Workspace formally known as “Groove” If you don’t use Microsoft SharePoint Workspace and like to remove the option without uninstalling Office components.


You can remove it by simply editing a registry sub key.

1.Run Registry Editor.
2.Go to
HKEY_CLASSES_ROOT\Directory\Background\shellex\
ContextMenuHandlers\

3.Delete the sub key called:
XXX Groove GFS Context Menu Handler XXX

4.In case you want fully remove it from all right click context menu. (Optional)
HKEY_CLASSES_ROOT\*\shellex\ContextMenuHandlers\XXX Groove GFS Context Menu Handler XXX

HKEY_CLASSES_ROOT\Directory\shellex\ContextMenuHandlers\XXX Groove GFS Context Menu Handler XXX

HKEY_CLASSES_ROOT\Directory\Background\shellex\ContextMenuHandlers\XXX Groove GFS Context Menu Handler XXX

HKEY_CLASSES_ROOT\Folder\shellex\ContextMenuHandlers\XXX Groove GFS Context Menu Handler XXX

HKEY_CLASSES_ROOT\AllFilesystemObjects\shellex\ContextMenuHandlers\XXX Groove GFS Context Menu Handler XXX

Thursday, April 25, 2013


When you install windows 7 in freshly formatted disk drive the windows by default creates the extra partition named system reserved partition for the better performance. By default the partition is hidden and does not show in my computer window. But in case if you have that partition showing in your my computer windows you can hide it anyways using disk management.

Here is what you do to hide the system reserved partition in windows 7.

1.Type:
diskmgmt.msc
2.Right click system reserved partition.
3.Click change drive letters and paths.
4.Remove the drive letter.
5.Ignore the warning and Accept.

Thursday, September 20, 2012

This guide explains how to set up a router for home computer networks. The exact names of configuration settings on a network router vary depending on the model and whether it is wired or wireless. However, this general procedure will guide you through the process for the common kinds of home network equipment.
Difficulty: Average
Time Required: 1 hour


What You Need
  • A network router (wireless or wired)
  • Network adapters installed on all devices to be connected to the router
  • A working Internet modem (optional)
  • A Web browser installed at least one computer in the network

Here's How:
  1. Choose a convenient location to begin installing your router such as an open floor space or table. This does not need to be the permanent location of the device. Particularly for wireless routers, you may find it necessary to re-position the unit after installing it as the cables / signals may not reach all areas needed. At the beginning, its better to choose a location where it's easiest to work with the router and worry about final placement later.
  2. Plug in the router's electrical power source, thenturn on the router by pushing the power button.
  3. (Optional) Connect your Internet modem to the router. Most network modems connect via anEthernet cable but USB connections are becoming increasingly common. The cable plugs into the router jack named "WAN" or "uplink" or "Internet." After connecting the cable, be sure to power cycle (turn off and turn back on) the modem to ensure the router recognizes it.
  4. Connect one computer to the router. Even if the router is a wireless model, connect this first computer to the router via a network cable. Using a cable during router installation ensures the maximum reliability of the equipment. Once a wireless router installation is complete, the computer can be changed over to a wireless connection if desired.
  5. Open the router's administration tool. From the computer connected to the router, first open your Web browser. Then enter the router's address for network administration in the Web address field and hit return to reach the router's home page.

    Many routers are reached by either the Web address "http://192.168.1.1" or "http://192.168.0.1" Consult your router's documentation to determine the exact address for your model. Note that you do not need a working Internet connection for this step.
  6. Log in to the router. The router's home page will ask you for a username and password. Both are provided in the router's documentation. You should change the router's password for security reasons, but do this after the installation is complete to avoid unnecessary complications during the basic setup.
  7. If you want your router to connect to the Internet, you must enter Internet connection informationinto that section of the router's configuration (exact location varies). If using DSL Internet, you may need to enter the PPPoE username and password. Likewise, if you have been issued a staticIP address by your provider (you would need to have requested it), the static IP fields (including network mask and gateway) given to you by the provider must also must be set in the router.
  8. If you were using a primary computer or an older network router to connect to the Internet, your provider may require you to update the MAC address of the router with the MAC address of the device you were using previously. Read How to Change a MAC Address for a detailed description of this process.
  9. If this is a wireless router, change the network name (often called SSID). While the router comes to you with a network name set at the factory, you will never want to use this name on your network. Read How to Change the Router SSID for detailed instructions.
  10. Verify the network connection is working between your one computer and the router. To do this, you must confirmed that the computer has received IP address information from the router. See How to Find IP Addresses for a description of this process.
  11. (If applicable) Verify your one computer can connect to the Internet properly. Open your Web browser and visit a few Internet sites such as http://compnetworking.about.com/.
  12. Connect additional computers to the router as needed. If connecting wirelessly, ensure the network name (SSID) of each is computer matches that of the router.
  13. Finally, configure additional network security features as desired to guard your systems against Internet attackers. These WiFi Home Network Security Tips offer a good checklist to follow.
Tips:
  1. When connecting devices with network cables, be sure each end of the cable connects tightly. Loose cables are one of the most common sources of network setup problems.

Tuesday, August 28, 2012

Windows XP provides support for Internet Protocol (IP) networking over the IEEE 1394 bus. The interface is listed in the Network Connections folder as "1394 Connection". Internet Protocol (IP) over Institute of Electrical and Electronics Engineers, Inc. (IEEE) 1394 does not require a network adapter, but can be connected only to other 1394 interfaces; you cannot directly connect a 1394 cable to an Ethernet hub.

Windows XP requires an OHCI IEEE 1394 interface to enable IP over 1394. When the 1394 interface is installed, Windows XP creates a 1394 Connection in the Network Connections folder. You can modify Transmission Control Protocol/Internet Protocol (TCP/IP) configuration settings by using the properties for this connection. To create a network by using IP over 1394 support, connect two Windows XP computers with IEEE 1394 ports together with a 1394 cable. While this connection is present, Ipconfig.exe displays the interface as 1394 Connection.

The following files provide IP over 1394 functionality:


  • Nic1394.sys

This is an NDIS miniport driver that is responsible for fragmentation and reassembly of data and performs input/output (I/O) operations on virtual circuits. A virtual circuit is a connection to a memory address on a 1394 interface. There are three types of virtual circuits: Channel VC (Broadcast), Transmit VC, and Receive VC.


  • Arp1394.sys

Provides Address Resolution Protocol (ARP), ARP caching, and Multicast Channel Allocation Protocol (MCAP), which facilitates multicast communication on the 1394 bus.

  • Enum1394.sys
This is a WDM driver that is associated with IP-capable nodes, which are 1394 interfaces that are capable of communicating by using IP over 1394.

  • 1394bus.sys
This is the IEEE 1394 WDM bus driver.


  • Swenum.sys
Provides 1394 device enumeration.

Friday, July 27, 2012


Method One - Uninstall and then reconnect the external hard drive

1.This method resolves issues where the currently loaded USB driver has become unstable or corrupt.
2.Click Start, type Device Manager in the Search box
3.Click Device Manager from the returned list.
4.Click Disk Drives from the list of hardware
5.Right-click the USB external hard drive with the issue, and click Uninstall.
6.After the hard drive is uninstalled, unplug the USB cable.
7.Wait for 1 minute and then reconnect the USB cable. The driver should automatically load
8.Check for the USB drive in Windows Explorer

*Connecting your USB external hard drive into a non-powered USB hub can cause a lack of enough power to operate the external drive. Instead, plug it directly into your computer.

If this method does not resolve your issue, proceed to Method Two.

Method Two - Install the latest Windows Updates

1.This method will install the latest device drivers for your USB external hard drive.
2.Click the Start button, type Windows Update in the Search box, then click Windows Update in the results pane.
3.Click Check for Updates. After the scan is complete, click Review optional updates.
4.Click the check box next to the updates, then click Install updates.
5.If prompted, review the license agreement, then click I Accept.
6.Follow the onscreen instructions to download and install the updates.
7.If prompted, reboot your computer.
If your problem still exists, proceed to Method Three.

Method Three - Reinstall USB controllers

1.This method resolves steps where the currently loaded USB driver has become unstable or corrupted.
2.Click Start, then type device manager in the Search box, then click Device Manager.
3.Expand Universal Serial Bus controllers. Right click a device and click Uninstall. Repeat for each device.
4.Once complete, restart your computer. Your USB controllers will automatically install.
5.If your problem still exists, proceed to Method Four.

Method Four - Disable USB selective suspend setting

1.This method prevents your USB external drive from powering down.
2.Click the Start button, type power plan in the Search box, then click Choose a power plan.
3.Next to your currently selected plan, click Change Plan Settings.
4.Click Change advanced power settings.
5.Click the box to expand USB Settings, then expand USB selective suspend settings.
6.Click Plugged in, then click the drop down menu and select disabled.
7.If you're using a laptop, click Battery, then click the drop down menu and select disabled.
8.Click Apply, then click OK.

Saturday, July 21, 2012


What is Safe Mode?
A software mode that enables users who use Microsoft Windows 95, 98, ME, 2000, XP, Vista and 7 computers enter safely into Windows and correct any problems that may be preventing them from entering Normal mode.

What makes Safe Mode different from normal mode, is that it uses Windows default drivers and settings. This helps users correct any issues preventing them from getting into normal mode.

Safe mode was first introduced in Microsoft Windows 95 and is available in all versions of Microsoft Windows except Microsoft Windows 3.x, Windows NT 3.0, and Windows NT 4.0.

"Safe mode = launch the minimum process for system repair process" - Han Bin


Question:
How to move the mouse cursor with the keyboard in Windows.

Answer:
If you cannot boot into normal Windows mode or cannot troubleshoot because of errors in normal mode boot into Safe Mode. Windows Safe Mode bypasses startup programs and drivers that are not required for Windows to load and will allow you to fix Windows problems


Method One

Windows 2000 and XP users
Tip: If you are running Safe Mode because you cannot get into Windows, you may want to first try loading the last known good configuration.

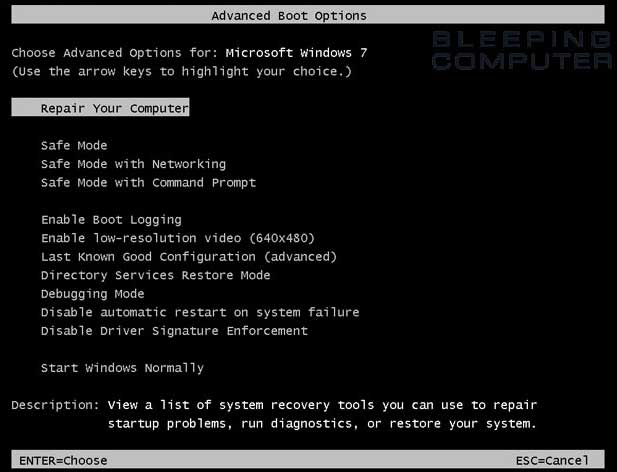
To get into the Windows 2000 and XP Safe mode, as the computer is booting press and hold your "F8 Key" which should bring up the "Windows Advanced Options Menu" as shown below. Use your arrow keys to move to "Safe Mode" and press your Enter key.

Note:
With some computers, if you press and hold a key as the computer is booting you will get a stuck key message. If this occurs, instead of pressing and holding the "F8 key", tap the "F8 key" continuously until you get the startup menu.

Trouble Getting into Windows 2000 or Windows XP Safe mode
- If after several attempts you are unable to get into Windows 2000 or Windows XP Safe Mode as the computer is booting into Windows, turn off your computer. When the computer is turned on the next time Windows should notice that the computer did not successfully boot and give you the Safe Mode screen.


Once you're done in Safe mode if you want to get back into Normal Windows restart the computer like you normally would and let it boot normally.

Microsoft Windows Vista and Windows 7 users
Tip: If you are running Safe Mode because you cannot get into Windows, you may want to first try loading the last known good configuration.

To get into the Windows Vista and Windows 7 Safe Mode, as the computer is booting press and hold your "F8 Key" which should bring up the "Windows Advanced Options Menu" as shown below. Use your arrow keys to move to "Safe Mode" and press your Enter key.

Note: With some computers if you press and hold a key as the computer is booting you will get a stuck key message. If this occurs, instead of pressing and holding the "F8 key", tap the "F8 key" continuously until you get the startup menu.

Trouble Getting into Safe mode - If after several attempts you are unable to get into Safe Mode as the computer is booting into Windows, turn off your computer. When the computer is turned on the next time Windows should notice that the computer did not successfully boot and give you the Safe Mode screen.


Once you're done in Safe mode if you want to get back into Normal Windows restart the computer like you normally would and let it boot normally.

Windows 98 and ME users
To get into Windows 98 and ME Safe Mode, as the computer is booting press and hold your "F8 key" on the top of your keyboard or press and hold the left or right Ctrl key as the computer is booting. If done properly you should get into the "Windows 98 and ME Startup Menu" similar to the below screen example. In this menu choose option 3 by pressing the 3 key and press enter. 

Note: With some computers if you press and hold a key as the computer is booting you will get a stuck key message. If this occurs, instead of pressing and holding the "F8 key", tap the "F8 key" continuously until you get the startup menu.


Once you're done in Safe mode if you want to get back into Normal Windows restart the computer like you normally would and let it boot normally.

Windows 95 users
To get into Windows 95 Safe Mode, as the computer is booting, when you either hear a beep or when you see the message "Starting Windows 95", press your F8 key on the top of your keyboard. If done properly you should get into the Windows 95 Startup menu similar to the below screen. In this menu choose option 3 by pressing the 3 key and press enter.


How do I get out of Safe Mode?
From Windows Safe Mode click Start, Shutdown, and restart the computer. This will start the computer automatically back into Normal Mode.

Note: Many users believe that they are still in Safe Mode because the colors or video may not look correct. Unless in the corners of the screen it says "Safe Mode", you are not in Safe Mode. For information on how to setup your video card resolution, see document CH000190.

If you are rebooting the computer and it is rebooting back into Safe Mode (it does say "Safe Mode" in each of the corners), it is likely another problem exists with Windows preventing it from loading into Normal Windows. We recommend you see the basic troubleshooting section for additional ideas that may help to resolve your issue.


Which Safe Mode option should I choose?
Users who are running later versions of Windows will get several different options for different versions of Safe Mode. For example, you may have options for "Safe Mode", "Safe Mode with Networking", and "Safe Mode with Command Prompt." Below is a brief description of each of these different modes.

Safe Mode
The basic Safe Mode option is usually what most users will want to choose when troubleshooting their computer. This is the most basic Safe Mode option and has no additional support.

Safe Mode with Networking
For users needing access to the Internet or the network they're connected to while in Safe Mode users may wish to choose this option. This mode is helpful for when you need to be in Safe Mode to troubleshoot but also need access to the Internet so you can get updates, drivers, or other files to help troubleshoot your issue.

Safe Mode with Command Prompt
This Safe Mode would also allow you to have access to the command line (MS-DOS prompt).

Method Two
Using Msconfig to get into Safe Mode

1.Click the "Start" button on the taskbar. When the Start Menu appears, click the "Run" menu option. (As a shortcut, you can simply press WinKey+R on the keyboard.)
2.In the dialog box that appears, type


msconfig

The System Configuration Utility executes.
3.Look for the tabs at the top of the screen. One will say "BOOT.INI". Click on that tab.
4.There will be a few checkboxes in the lower portion of the window. Check the box next to the text "/SAFEBOOT".
5.Click "OK", and restart your computer.

*Some of the PC does not support USB keyboard at startup,so you may use this method.
**You will no longer boot into regular mode until you uncheck the box next to "/SAFEBOOT" in the System Configuration Utility.

Monday, June 25, 2012


Method One
1.Plug your USB Pendrive or External HDD or Memory Card which is Affected.
2.Go to Start -> Run-> Type CMD and Enter
3.Find the drive letter for the connected USB drive. For Example, I:
Type:
I:


4.Then type:
attrib -s -h /s /d *.*


5.Hit enter and wait for few seconds.

Method Two
1.Use USB Show which you can download it from here.
2.Extract the archive.
3.Press on the Recovery The Hide Files.

Friday, June 15, 2012


1.Open the notepad.
2.Copy and paste the commands to the notepad.

Type:
cls
:End
@ECHO OFF
title Folder Locker
if EXIST "Control Panel.{21EC2020-3AEA-1069-A2DD-08002B30309D}" goto UNLOCK
if NOT EXIST Locker goto MDLOCKER
:CONFIRM
echo Are you sure u want to Lock the folder(Y/N)
set/p "cho=>"
if %cho%==Y goto LOCK
if %cho%==y goto LOCK
if %cho%==n goto END
if %cho%==N goto END
echo Invalid choice.
goto CONFIRM
:LOCK
ren Locker "Control Panel.{21EC2020-3AEA-1069-A2DD-08002B30309D}"
attrib +h +s "Control Panel.{21EC2020-3AEA-1069-A2DD-08002B30309D}"
echo Folder locked
goto End
:UNLOCK
echo Enter password to Unlock folder
set/p "pass=>"
if NOT %pass%==123456789 goto FAIL
attrib -h -s "Control Panel.{21EC2020-3AEA-1069-A2DD-08002B30309D}"
ren "Control Panel.{21EC2020-3AEA-1069-A2DD-08002B30309D}" Locker
echo Folder Unlocked successfully
goto End
:FAIL
echo Invalid password
goto end
:MDLOCKER
md Locker
echo Locker created successfully
goto End

*Change the '123456789' for the password you like.

3.Save the files as:
locker.bat

Wednesday, June 6, 2012


Static IP address assignment (sometimes also called fixed addressing) is an alternative to dynamic addressing (normally, DHCP) on Internet Protocol networks. Dynamic addressing is convenient. It also allows mobile computers to more easily move between different networks.


However, static IP addressing also offers some advantages:


  • A static IP address best supports name resolution, so that a computer can be most reliably reached over the network by its host / domain name. Web and FTP servers in particular benefit from fixed addressing for this reason.


  • Using static IP addresses on home networks gives somewhat better protection against network security problems than does DHCP address assignment.


  • Some network devices do not support DHCP. Using static IP address assignment for all devices on the home network guarantees to avoid potential address conflicts where DHCP may supply an address already assigned statically elsewhere.

When using static IP addresses on home and other private networks, they should be chosen from within the standard private IP address ranges listed:


  • 10.0.0.0 through 10.255.255.255
  • 172.16.0.0 through 172.31.255.255
  • 192.168.0.0 through 192.168.255.255

These ranges support many thousands of different IP addresses. It's common for people to assume that any address in these ranges can be chosen and the specific choice doesn't matter much. This is untrue. To choose and set specific static IP addresses suitable for your network, follow these guidelines.


  • Do not choose any addresses that end with ".0" or ".255" - these addresses are generally reserved for use by network protocols.


  • Do not choose the addresses at the beginning of a private range. IP addresses like 10.0.0.1 and 192.168.0.1 are very commonly used by network routers and other consumer devices. These are the first addresses someone will attack when trying to break into a private computer network.


  • Do not choose an address that falls outside the range of your network mask. For example, to support all addresses in the 10.x.x.x private range, the network mask on all devices must be set to 255.0.0.0, otherwise some static IP addresses in this range will not work.

Monday, June 4, 2012


1.Click Start > All Programs > Accessories > Command Prompt.


After open command prompt,


2.Type:
ipconfig


3.Check for your adapter IPv4 address.


Sunday, June 3, 2012


Method One
1.Click on Start > Run.


2.Type:
cmd


After open command prompt,


3.Type:
ipconfig /all


4.Look for Physical Address. This your MAC address. Make sure you get the physical address of the correct network adapter - usually there are several listed.


Method Two
1.Click on Start > Run.


2.Type:
cmd


After open command prompt,


3.Type:
getmac


Normally the first one will be your MAC address.